

If you have an RV that cost less than $100,000, chances are its toilet is an Aqua Magic toilet, made by Thetford. These are the most common permanent toilets found in RVs, and fortunately, they're also pretty easy to work with.
In case you find yourself in a situation where you need to remove your Aqua Magic toilet so you can repair or replace it, here's how to get the job done.
Reverse Installation
If you installed your Aqua Magic toilet, you're already halfway there. Removing it just requires you to follow those installation directions in reverse order. All you need is an adjustable wrench.
- Turn off the water pressure, either by turning off the "City Water" valve or by turning off the switch for the on-board water pump.
- Flush the toilet to empty water from the bowl and remove remaining water pressure.
- Disconnect the water line from the water valve/elbow.
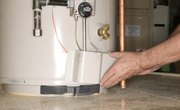
- Loosen the two nuts at the base of the toilet.
- Lift the toilet from the floor.
- Remove the closet flange seal.
While working on your toilet, consider placing a rag across the hole to stifle odors and keep things from falling into the black-water tank.
If your repair involves the blade seals, pour a quart of water into the toilet to make sure the new seals will hold water before reinstalling the toilet. If you're replacing the water valve, pressurize the water system after reinstalling the water line to make sure the valve doesn't leak before you bolt down your toilet.
Also consider installing a new flange seal before reinstalling your toilet.
To Avoid Removing the Toilet
Because Aqua Magic toilets are so popular, their parts are readily available, meaning you'll rarely have to replace the entire toilet if something stops working on it.
Troubleshoot for any of the following problems before resorting to removing your toilet:
- For leaks at the back of the toilet: Check the water supply line connection at the water valve. Secure or tighten it to see if that helps the leak. If it doesn't, replace the valve.
- For vacuum breaker leaks while flushing: Replace the vacuum breaker or water module.
- For leaks between the closet flange and the toilet: Make sure the nuts on the flange are tight. If the leak continues, you will have to remove the toilet to make sure the flange is 7/16 inch above the floor. Use spacers to adjust the height if necessary, and replace the flange seal.
- If the toilet won't hold water: Check for debris from the blade/ball seal track, and remove it. Also check to see if the blade/ball seal is worn, and if so, replace it.
-
If it's hard to flush: Apply some toilet seal lubricant and conditioner or silicone spray to the blade/ball. Don't use other types of lubricant
– silicone only. * If it's not flushing well: Make sure the pedals or hand levers are being held fully open when you flush, which should only take two to three seconds. If there's still a problem, remove the water supply line to check the flow rate, which should be at least 10 quarts per minute.
References
Writer Bio
Brenna Swanston is a freelance writer, editor and journalist. She covers topics including environment, agriculture and travel. She previously reported for the Sun newspaper in Santa Maria, Calif., and holds a bachelor's in journalism from California Polytechnic State University. Swanston is an avid traveler and loves jazz, yoga and craft beer.