
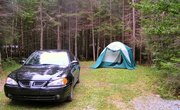


The Kelty Ridgeway tent has several rooms, a screened porch and sleeps up to eight people. The two side rooms have privacy curtains and the main room provides a large space with access to the screen room. The tent is designed for family use, but it is also effective as a large living space for small groups and individuals. The setup process is best attempted by several people because the tent has multiple poles to manage.
Items you will need
Tent
Fiberglass poles
Steel upright poles
Stakes
Rain fly
Select a flat camping area and clean the area of sticks and rocks. Remove the tent from the bag and spread out the tent body with the floor on the ground. Assemble the tent poles by connecting the attached sections at the ferrules. Set the poles on the ground and separate by size.
Locate the three long sleeves on the tent body. One sleeve is horizontal over the screen room and the other two cross the main tent body to create an "X". Locate the three long poles and slide one through each sleeve. Place the corresponding pins in the end of the poles. The poles will flex and erect the tent body. This step is best attempted with two or more people.
Attach the clips to the exposed sections of the tent poles. The clips are attached to the ten fabric and will add rigidity to the tent. Locate the next largest pole and insert it through the sleeve on the screen house. Locate the metal grommets where the screen room meets the main tent and place each end of the pole in a grommet.
Locate the two smallest poles. These are for the side rooms. Insert one pole through each of the side room sleeves. Attach the ferrule of one steel pole to each end of the side room pole. Insert the corresponding pins in the end of the upright poles to support the side rooms.
Pull on each end of the tent to ensure the floor is tight. Use a rock to pound stakes through the ground loops on the tent. Place the floor mat in front of the screen room door and use stakes to secure the mat to the ground.
Place the fly on the tent and make adjustments until the shape of the fly matches the tent. The fly will only cover the top of the screen room and the entire body of the main tent. Locate the D-rings on the base of the tent and attach the fly hooks to the closest rings. This will tighten the fly to the tent body.
Locate the guy ropes on the fly. Pull the ropes to the ground at an angle and pound stakes through the loops to anchor the tent to the ground.
Warnings
- Do not set up the tent near a fire pit. The tent materials are flammable and must be out of reach of sparks and flames.
Tips
- Use multiple people to make the setup process run smoothly. Also choose a large tent site to accommodate the large tent.
References
Tips
- Use multiple people to make the setup process run smoothly. Also choose a large tent site to accommodate the large tent.
Warnings
- Do not set up the tent near a fire pit. The tent materials are flammable and must be out of reach of sparks and flames.
Writer Bio
Zach Lazzari is a freelance outdoor writer specializing in hunting, fly fishing and the general outdoors. He guided fly fishing trips for 10 years in Colorado, Alaska, Montana and Patagonia-Chile. Zach lives in Montana and splits time between the river and keyboard.